Monoprice Select Mini 3D Printer Experience

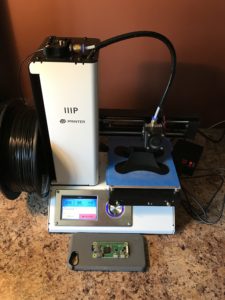
IMG_0578I’ll admit, when I bought the Monoprice Mini Select 3D printer, I knew almost nothing about 3D printing. That won’t get you very far after you unbox the printer. There are some basics you need to learn to get good prints.

Once you have a 3D model in a print file format like STL you still need to put it in a program to tweak for your printer settings that has a slicer that creates a file usable by your printer. Beyond that, many prints require extra work to determine the thickness of walls that will look nice, supports for prints that have large overhangs, and more. It’s not rocket science; you just need to learn how the process works.

Thankfully, this printer has a lot of online help from owners on G+, Facebook, and especially YouTube.

Here’s a print session for a Pi Zero W case I found on thingiverse.com.

Tuning PID for Better Temp Control

Apparently, the out of the box temperatures for printing for this printer can fluctuate a lot. Most control systems use a PID controller to constantly measure the target values and use specific values for this (specified by the letters PID in the acronym). The good news is that you can tweak this printer’s values to get better results. I did this before my first print. Resources below:

While you can probably put these commands in a.gcode file and print them, I used this software to set the values. http://www.pronterface.com/

Printing Hints I’ve Discovered

  • Skip using the SD card and printing from the printer menu. Sometimes prints hang if you don’t upgrade the firmware (wanted to stay out of the box initially). Print from a computer with Pronterface (above) or even better, use Octopi (what I do now). Don’t use Cura on Mac to print; it just pauses every 10 seconds.
  • Use a good “slicer” application to create your print files. I do like Cura, and it’s available on Mac and Windows. If longer items can fit sideways, they’ll print faster. Have an item too large for the bed? You might be able to rotate it slightly to fit diagonally.
  • Print the first layer SLOW-half speed-on anything long or with quick angle changes.
  • Watch the printer. It can go bad. Octopi supports a camera!
  • Prints don’t stick without some help. Use a “raft” with your print if it doesn’t cover much surface area, and generally always use a light layer of glue stick on the tape on the bed.

The Octopi interface is great and works from any device anywhere. Why be tethered when you can watch remotely?

My Impressions

While I got some great prints with a little tweaking, I’m a bit concerned that this printer could be a black hole of my time doing mods. Apparently, Monoprice has a new model coming out in a few weeks that has many of these community mods built in, and most importantly, a replaceable hotend. I can already tell I’ll need to reroute the cables under the print bed (not attached correctly), install a stabilizer, and a couple other items. I may take advantage of Monoprice’s 30 day satisfaction guarantee and wait for the upgraded version to save me some time (and money in the long run).

Good luck!

Raspberry Pi – Under Voltage or Temperature Issues

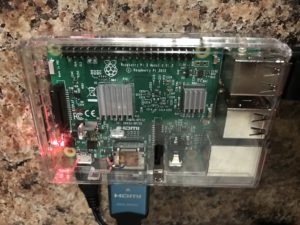
IMG_0423Step number one for ANY Raspberry Pi issue is “check the power supply”! Many issues on the Pi come from improper power; SD card corruption is a popular one. Often, people, including me, try to use an adapter with a Micro USB cable. Even if the adapter is rated for 5+ volts and 2.5A (for Pi 3), the quality or length of the cable might limit the power it can draw. For this reason, some people recommend a corded power supply, typically one from a “trusted source” like Adafruit. Despite using the “right” power supply on my two Model 3B devices, I was seeing under-voltage warnings (rainbow block) and at one point, a temperature warning. One was using an Adafruit supply and the other an iPad supply (both higher rated and with a nice thick cord). Both are in a cheap case I got from MicroCenter.

The software I was using had a menu system with some video on the screen, and it was consuming about 50–60% of a CPU core. I was seeing temps in the 77-79 range with some CPU throttling. It was curious to me that this activity was drawing so much on the power supply that I’d get an under-voltage warning. I removed all USB devices to be sure nothing other than the Pi was using the power. Even when I swapped the SD card, Pi, and power supply, it was pretty predictable that after about 15 minutes of use, I’d see the rainbow block.

I decided to run sysbench to see if a much higher CPU utilization (maxing out all four cores) would generate much more heat. Interestingly, while it did heat up more quickly, the top temps were about 83-85 with some significant throttling to keep the temps at bay. Again, the under-voltage warnings appeared. To me, it seemed like the heat was triggering the under-voltage warnings.

Sysbench:

sysbench –num-threads=8—test=cpu—cpu-max-prime=10000000000 run

Temp/Throttle Monitoring:

watch ‘(vcgencmd measure_temp; vcgencmd measure_clock arm) ‘

Next, I ran a test at a much lower CPU utilization, but covered up the case to build up the heat, and after about 10 minutes, I got the rainbow block again. I wouldn’t think these minor changes in temperature would affect the voltage draw, especially given the throttling. I picked up a pair of cheap stick-on “Addacore” CPU stick-on heat sinks (yeah, I said stick-on). I repeated the same experiments and they clearly did their job. I saw a consistent drop in temps of about 4-5 degrees, which is more than enough to prevent the throttling and the under-voltage warning (which I’m not sure I believe). Even the system bench test had much lower temps and less throttle.

OK, it’s 3M tape. I would not mount this Pi vertically because I suppose if it got warm enough gravity might have its way with this adhesive and ruin the board, but it’s working great. No more high temperatures or under-voltage warnings. While I’m tempted to remove one of them and repeat the experiment and measure the voltage from the Pi with a meter, I’m going to leave well enough alone.

Anyway, if you are seeing rainbow blocks, check your power, but also check your temps and try a heat sink:)

Using Wix only for a subdomain

If you have a site registered and working with a hosting site for foobar.com but want to use a subdomain like sales.foobar.com with Wix it’s pretty easy to setup as long as you don’t only follow their help page and read the specifics. The Wix help page gives you a really good clue in this scenario (which I’m surprised they bother to support) but it’s not complete.

Many hosting companies use cPanel or another tool with a DNS zone editor. The instructions have you point the domain (sales.foobar.com)  by creating an “A” record to a specific IP address. You also need to add a “CNAME” record for the www prefix (which is easy to overlook in the instructions). In my example would be setting www.sales.foobar.com to their server. Unfortunately the instructions leave out another domain name you need a CNAME for which is m.sales.foobar.com. Their help guide misses this one so to see details of each of the CNAME records and the A record is to “My Account / My Domains” and click on the advanced tab. Open up each of the collapsed items for what I have mentioned above. The also suggest you change your name server, but of course if you main domain is hosted elsewhere you won’t do that.

So in summary – log in to Wix, go to the “advanced” tab of your domain and set you hosting company DNS zone file for the A record IP, and the www. and m. CNAME records and you’ll be set. The whole thing should take 10 minutes. It seems the “Check Connection” tool is trying to validate the DNS entry they don’t control (foobar.com) or my changes haven’t propagated to their servers yet.