Using OctoPi with USB Camera

OctoPrint is an amazing little app with a simple web interface that controls your 3D printer. It has the ability to manage your gcode files or even take STL files and “slice” them into gcode files (which I’d never use since I like to visualize the layering in a tool first). OctoPi is a Raspberry Pi distribution of the tool that runs on the Pi. I had an older Raspberry Pi B that was perfect to throw at my need to remote control/monitor my longer 3D prints.

FullSizeRender 17

View of interface on iPhone

Disclaimer: I know the Raspberry Pi camera using the camera interface is “the way to go”. But an older camera you have (or $5 Playstation Eye camera) is worth a try right? No way, CPU will be too high, you won’t have enough USB ports, system will run too hot, will cause printing to pause … or will it?

The way OctoPrint integrates with a camera is by pulling into its page a video stream from mjpg_streamer (a web server running on a different port). This tool takes content from your web camera and creates a web video stream.  This software is distributed with the OctoPi build, no extra install required. Building the stream is a much more efficient if your camera is newer and has support for MJPG – otherwise you’re using YUYV encoding and the Pi has to do a lot of extra work. Nevertheless you can make this work. I use the following options to run the streamer:

./mjpg_streamer -i "input_uvc.so -f 1 -q 50 -y -r 640x480" -o "output_http.so -w ./www"

The important parameters above is the “-f 1” which says do one frame per second (I’m not looking for high quality video – I just want to see if print has lifted and get a feel of progress). The “-q 50″ controls quality of the result compression.

You can update settings in /boot/octopi.txt so these are used by default. This can be done by ssh to your machine or shut the machine down and edit the file on your computer after putting in the SD card.

camera_usb_options=”-f 1 -q 75 -y”

The advantage of changing the settings in the boot config file is every time you unplug the camera the process dies, and when it starts it will use this setting (there is a background process called “webcam” that handles this).

I tried changing the resolution and surprisingly  didn’t find a change in CPU usage so opted to keep it. As far as CPU, the system is running high at 85% and most of that usage is from the mjpg_streamer process.

Command to check temperature:
vcgencmd measure_temp

So yes, it runs the CPU pretty high (80%+) and the temperatures run a few degrees higher (but at 54’C well below limits), and the initial OctoPrint interface loads a bit slower. If you don’t want to spend money on a $30 Pi camera or a more expensive USB camera I think you can make it work.

Useful Documentation Page on Settings per Camera

Raspberry Pi – Under Voltage or Temperature Issues

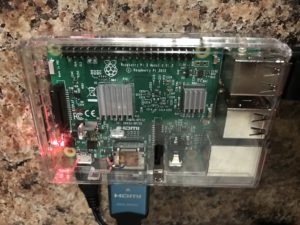
IMG_0423Step number one for ANY Raspberry Pi issue is “check the power supply”! Many issues on the Pi come from improper power; SD card corruption is a popular one. Often, people, including me, try to use an adapter with a Micro USB cable. Even if the adapter is rated for 5+ volts and 2.5A (for Pi 3), the quality or length of the cable might limit the power it can draw. For this reason, some people recommend a corded power supply, typically one from a “trusted source” like Adafruit. Despite using the “right” power supply on my two Model 3B devices, I was seeing under-voltage warnings (rainbow block) and at one point, a temperature warning. One was using an Adafruit supply and the other an iPad supply (both higher rated and with a nice thick cord). Both are in a cheap case I got from MicroCenter.

The software I was using had a menu system with some video on the screen, and it was consuming about 50–60% of a CPU core. I was seeing temps in the 77-79 range with some CPU throttling. It was curious to me that this activity was drawing so much on the power supply that I’d get an under-voltage warning. I removed all USB devices to be sure nothing other than the Pi was using the power. Even when I swapped the SD card, Pi, and power supply, it was pretty predictable that after about 15 minutes of use, I’d see the rainbow block.

I decided to run sysbench to see if a much higher CPU utilization (maxing out all four cores) would generate much more heat. Interestingly, while it did heat up more quickly, the top temps were about 83-85 with some significant throttling to keep the temps at bay. Again, the under-voltage warnings appeared. To me, it seemed like the heat was triggering the under-voltage warnings.

Sysbench:

sysbench –num-threads=8—test=cpu—cpu-max-prime=10000000000 run

Temp/Throttle Monitoring:

watch ‘(vcgencmd measure_temp; vcgencmd measure_clock arm) ‘

Next, I ran a test at a much lower CPU utilization, but covered up the case to build up the heat, and after about 10 minutes, I got the rainbow block again. I wouldn’t think these minor changes in temperature would affect the voltage draw, especially given the throttling. I picked up a pair of cheap stick-on “Addacore” CPU stick-on heat sinks (yeah, I said stick-on). I repeated the same experiments and they clearly did their job. I saw a consistent drop in temps of about 4-5 degrees, which is more than enough to prevent the throttling and the under-voltage warning (which I’m not sure I believe). Even the system bench test had much lower temps and less throttle.

OK, it’s 3M tape. I would not mount this Pi vertically because I suppose if it got warm enough gravity might have its way with this adhesive and ruin the board, but it’s working great. No more high temperatures or under-voltage warnings. While I’m tempted to remove one of them and repeat the experiment and measure the voltage from the Pi with a meter, I’m going to leave well enough alone.

Anyway, if you are seeing rainbow blocks, check your power, but also check your temps and try a heat sink:)